
Do Hanon Exercises Help? Turning Finger Patterns Into Better Piano Playing
Hanon exercises can help when you use a short pattern to examine something you can hear or feel in your playing: an uneven turn, a heavy thumb, a hurried change of position. Their value becomes much less clear when completing pages is the goal. Playing Exercise No.1 faster does not, by itself, tell you whether a melody sings better or a passage in your piece has improved.
I would begin with the piece. Find the moment that bothers you, then ask whether a Hanon pattern contains a useful part of that problem. After a little work on the exercise, return to the music. That return is where you find out what the exercise has contributed.
The useful questions are quite specific: Are the notes evenly spaced? Does an unwanted accent recur? Can the hand move into the next group without a pause? These give your attention a purpose beyond reaching the end of the page.
What Hanon No.1 actually asks
The opening pattern rises from C to E, continues through F and G to A, then returns through G, F and E. The next group starts on D and follows the same outline one step higher. There are eight sixteenth notes in each 2/4 bar, four to each quarter-note beat.
Both hands play the same note names an octave apart. Their fingerings are different: the right hand begins with the thumb, while the left begins with the little finger. This makes the exercise useful for comparing two ways of moving through the same sound pattern, provided you listen to each hand separately as well as together.
2/4, eight sixteenth notes per bar. Both hands begin in the bass staff: upward stems for the right hand, downward stems for the left.
Scroll sideways to read the score.
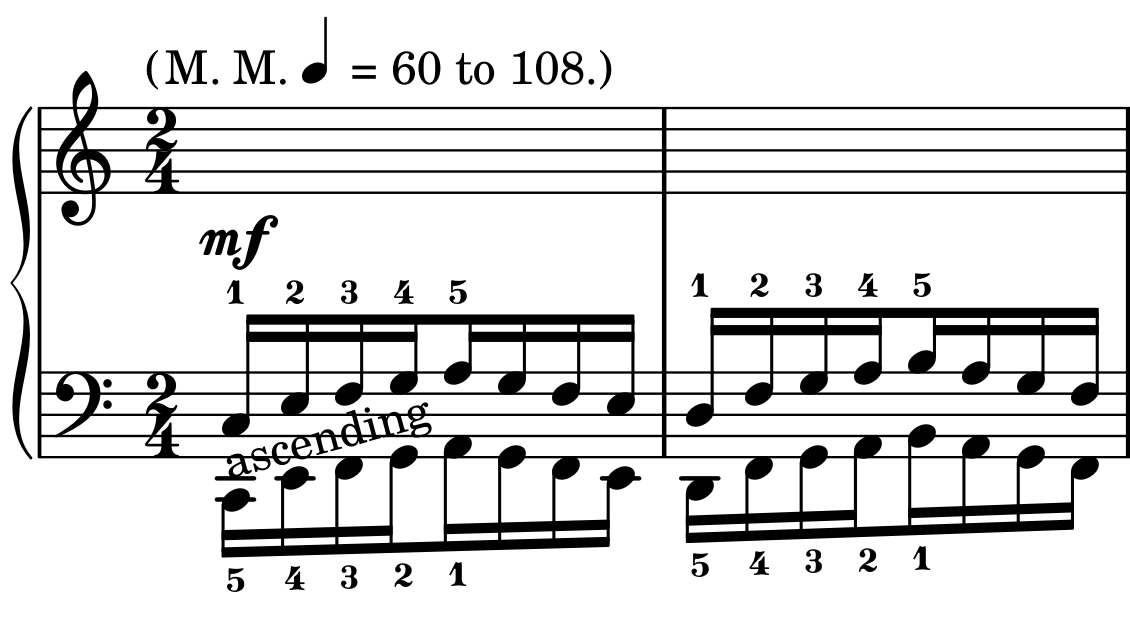
In this engraving, the first groups for both hands appear in the bass staff. The notes with upward stems belong to the right hand; those with downward stems belong to the left. The right hand begins on C below middle C, and the left hand an octave lower. Follow the finger numbers and stem directions rather than assuming that everything in the lower staff belongs to one hand.
There is a small but important distinction between the pattern and a scale. The opening skips D, then moves by step. The right-hand thumb starts a new group on D after the first group ends on E. That is a change of hand position within a repeating figure; it is not practice for every thumb crossing you will meet in a scale. The guide to using scales in actual piano passages develops that separate task.
Evenness has more than one meaning
A passage can have evenly spaced attacks but uneven volume. It can also sound smooth because the pedal overlaps everything while the fingers are actually rushing. Listen for timing, loudness and connection as separate features.
Play only the first group with one hand, without pedal. Let each note have a clear place in the beat. On a second attempt, listen for the loudest note. On a third, notice whether the ascent and descent have the same continuity. A short recording can help you hear an accent that is easy to miss while watching the keys.
If the right-hand A at the top of the pattern is unexpectedly loud, the answer is not necessarily to play the other seven notes louder. Examine how the hand reaches A and how it leaves for G. If the left-hand thumb on A lands heavily, compare the approach from G with the return to G. The same audible bump can arise at a different part of the movement in each hand.
When two adjacent notes bunch together, practise the pair with its neighbours. F–G–A–G gives you the approach and departure around the top of the first group. Keep the sound modest and the movement available. Repeating a tiny fragment with increasing force can make it more familiar without making it more controlled.
Once the notes are regular, give the group a little direction: move towards the top and away from it. Hear whether that shaping preserves the spacing. Evenness is a starting point from which you can choose a phrase, not an obligation to make every note in every piece identical.
The join between groups
The join often reveals more than the middle of the pattern. In the right hand, the first group ends on E with finger 2; the next begins on D with the thumb, then skips to F with finger 2. The hand has to prepare that new position while the music continues.
Practise the end of one group and the beginning of the next: G–F–E, then D–F–G. Keep track of where the bar line falls. A small hesitation before D is easy to overlook if you always restart there. An accent on D may be a deliberate beat emphasis, or it may be the sound of a hurried landing. Listen to which it is.
The left hand makes the same join with a different sequence of fingers. Its E at the end of the first group uses finger 4, followed by finger 5 on D and finger 4 on F. Watch whether the hand stays over the old position until the last moment. Allowing it to travel with the pattern is different from stretching the fingers to cover two positions at once.
Use two groups together, then three. The added length should reveal whether the joins remain fluent. It should not turn a clear problem into a long endurance test. If the third group collapses because you have lost track of the notes, read and prepare that group before repeating the entire page.
Rhythm changes and the metronome
Rhythmic variations can expose a rushed pair. Try the notes in a long–short pattern, then reverse it to short–long. The long note gives you time to prepare the next movement; the short note asks for a prompt response. Keep the pair's total length steady.
One pair, three ways of dividing the time
C and E from the opening. Each row lasts one eighth note; its four columns are equal thirty-second-note units.
Scroll sideways to compare the complete rows.
Equal
Long–short
Short–long
Return to the equal version. Listen for steadier spacing without carrying an unwanted accent over from the long notes.
These are temporary versions of the exercise. After each, return to equal sixteenth notes at a comfortable pace. Listen for whether the original rush has changed, and whether the long-note version has left a new accent behind. Being able to play several dotted versions is not the same outcome as improving the even version.
A metronome can support this comparison. With a click on each quarter note, place four equal sixteenths inside the click. At first, count the subdivisions if needed; later, hear the two main beats in the bar. A click that remains steady while your notes bunch up before it has not solved the spacing inside the beat.
The printed tempo range in the historical score is part of that exercise book's instructions. I would choose the working speed from the sound and movement in front of me. Increase it only far enough to find out whether the same control survives. If the join between groups becomes a scramble, work on the join rather than treating a higher metronome number as progress.
From Hanon to Burgmüller's Arabesque
Burgmüller's Arabesque, Op.100 No.2, makes a useful comparison because it also has quick, compact figures. The musical task is already different. In bars 3–4, the right hand plays short slurred gestures while the left supplies chords on the beats. A rest is part of each gesture's ending.
A minor, 2/4. Upper staff: treble clef. Lower staff: bass clef. The slur ends on an eighth note marked with a staccato dot, followed by an eighth rest.
Scroll sideways to read the score.
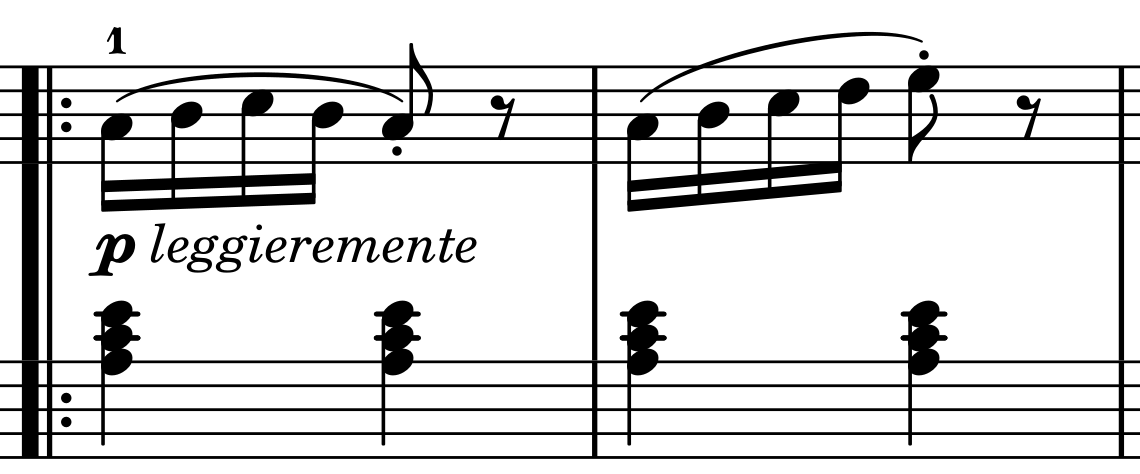
Bar 3 begins A–B–C–B in sixteenths, followed by an eighth-note A and an eighth rest. Bar 4 rises A–B–C–D in sixteenths, then lands on an eighth-note E before the rest. The four quick notes fill the first beat; the longer arrival and rest occupy the second.
Suppose the quick notes rush on the way down in bar 3. A small amount of work on the turning part of Hanon may help you hear and control that tendency. Return to A–B–C–B–A and test the actual phrase. Its last A has a different written length from the preceding notes, and the slur ends there with a dot. The musical result includes a light release and time for the rest.
Now add the left hand. Its chords coincide with the first A and the returning A in bar 3, then with A and E in bar 4. Listen for a clear right-hand gesture above the accompaniment. If both hands suddenly sound equally heavy, the problem is balance. Repeating Hanon in parallel octaves will not automatically teach the two hands their different roles here.
I would also start the passage from the two-bar introduction. The left hand establishes the character before the right enters. An exercise beginning with both hands together does not rehearse that entrance. Learning the quick notes is one part of making this little phrase speak.
When the moving notes change hands
Bars 12–13 of the same piece provide a stronger test. The left hand now has the quick figures, while the right hand carries a melody in longer notes. The hands no longer share either the rhythm or the musical job.
A minor, 2/4. Upper staff: treble clef. Lower staff: bass clef. The right-hand melody continues over the left-hand gesture.
Scroll sideways to read the score.
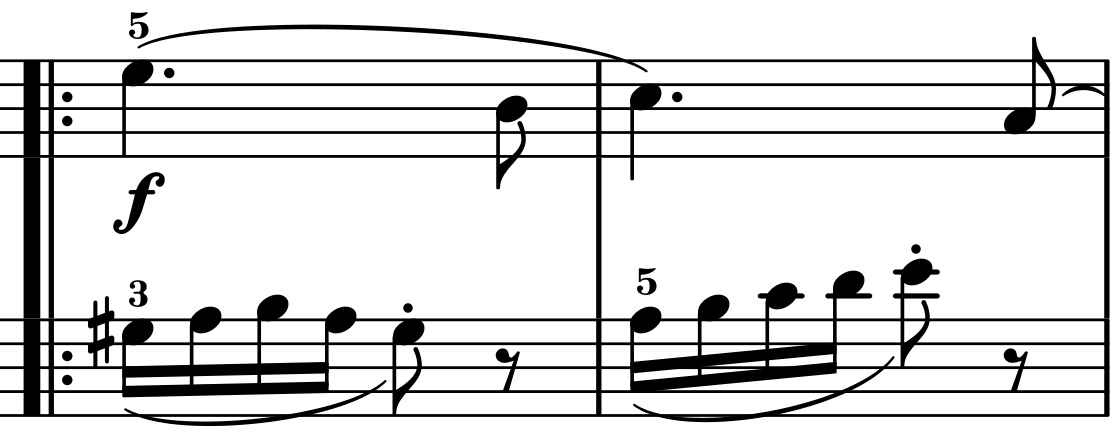
In bar 12, the left hand plays G-sharp–A–B–A in sixteenths, then an eighth-note G-sharp and an eighth rest. Above it, the right-hand E lasts for a dotted quarter note, followed by an eighth-note B. The right-hand B arrives exactly where the left-hand rest begins.
Play the right-hand E–B on its own and continue to the C in bar 13. Hear that melody as a line. Then play the left-hand gesture on its own, including the rest. When you combine them, keep listening to the right-hand E: it should continue while the left hand moves and releases. A tendency to lift both hands at once will cut it short.
Hanon may help you examine uneven notes in the moving left hand. It does not reproduce the need to hold and shape the right-hand melody, or to place a right-hand note against a left-hand rest. If those relationships are the difficulty, practise these two bars directly. The broader guide to piano hand coordination explains how to build that combination.
The G-sharp also changes the physical setting. A pattern that feels settled on white keys may need a different position when a black key enters. Read the actual notes and choose the movement for this passage. Transferring a listening skill is more useful than trying to preserve the exact hand shape of the exercise.
What the comparison tells you
After returning to the piece, describe the change in ordinary musical terms. “The descending notes no longer rush” is useful. So is “the notes are even alone, but the melody disappears when both hands play.” Both observations tell you what deserves attention next.
What changed in the piece?
- The quick notes are steadier, including the approach.
- The exercise has helped with that task. Continue shaping the phrase in the piece.
- One hand is fluent; the combination still breaks down.
- Work on the actual hand relationship: arrivals, held notes, rests and balance.
- Hanon is faster; the troublesome passage sounds the same.
- Reconsider the choice of exercise. Identify the movement or musical decision the passage actually requires.
A brief improvement immediately after an exercise is encouraging, but test the passage again later, including its approach. The piece may still depend on a particular starting point or an unusually slow tempo. Practising the lead-in and the next phrase helps the improved movement become available in context.
Sometimes the exercise gives you a clear answer: it is not addressing the main difficulty. A pedal change, a wide left-hand leap, reading several voices or deciding where a phrase should arrive requires other work. Keep the useful part of the exercise and give the piece the time its own demands need.
How much Hanon belongs in practice?
Give it a defined question and a limited place in the session. Two or three groups may be enough material to investigate a join; a longer span can reveal whether that join stays consistent as the hand travels. The amount follows the question. A fixed daily page count can keep you busy after the useful listening has stopped.
For a beginner, learning a new pattern may itself take considerable attention. Short pieces, simple scales and reading work also deserve that attention. For a returning pianist, an old exercise can feel familiar before the former tempo and practice load are comfortable again. Start with what you can play and assess now.
The historical directions include high finger lifting and ambitious claims about equalising the hands. Treat those as the book's teaching approach, not as a requirement to exaggerate movement or force a result. Choose movements with a teacher by their sound and ease in the actual task. If playing causes pain, stop and seek appropriate healthcare advice rather than pushing through the exercise. The piano tension and pain guide covers that boundary more fully.